
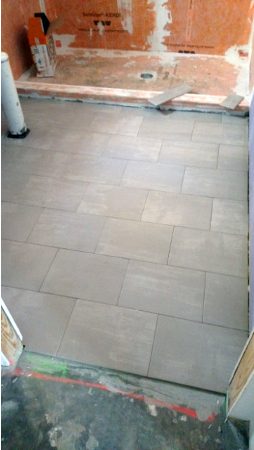
November 1 - The tile floor in the Great Room of the Guest House was finished today. The front door is in the upper left corner of the photo. The kitchen sink connections are in the upper right part of the photo.

November 1 - Although the wood walls and baseboard will cover the wall and would cover any gaps in the tile, notice how accurately the tile was trimmed around the door jamb.
 base.")
November 1 - The deck of the Screened Porch of the Guest House is being built up with a concrete base so the tile is the proper level. This should be finished tomorrow if there is enough concrete mix. The sub bought all in stock and he is not sure it is quite enough. If not, it will take just a day or so to get more. The other two Screened Porches do not need a very thick (if any) base.

November 1 - The doorway into the Bar from the Left Gallery now has wood flooring on it. There were several small places that were skipped because they could be completed with short left over pieces. Since most of the flooring is down, these places have been laid.

November 1 - The Kitchen wood floor is completely laid. It will be sanded around the perimeter and under the cabinets. The final finishing will be done towards the end of the project.

November 1 - The Great Room flooring is all down. The door sills have protective paper on them. That is why they are light.
, so the tile setter is going slowly to make sure his tile is as flat as possible.")
November 1 - Tile is going down in the Brays Room. The floor is not quite flat (typical of concrete floors), so the tile setter is going slowly to make sure his tile is as flat as possible.

November 1 - Here is another view of the Brays Room tile. The same pattern of widths is being used here as was used in the Guest House. This tile is very similar to the Guest House tile. It has a slightly different color.

November 1 - Notice how closely the wood floor is cut around the floor outlet in Bedroom #3. The cover that goes on the outlet will easily cover the gap.
 has been cleaned out of the yard. The orange tool is the mason's saw for cutting bricks. The concrete blocks are left overs from the foundation. They may be used when the steps are built (before they are covered with brick).")
November 1 - Storm debris (from Hurricane Matthew) has been cleaned out of the yard. The orange tool is the mason's saw for cutting bricks. The concrete blocks are left overs from the foundation. They may be used when the steps are built (before they are covered with brick).

November 1 - There was some storm debris behind the garage also. It was hauled off today.

November 1 - Storm debris in the back yard was also removed. The storm blew down hundreds of trees here and countless limbs.

November 1 - The house windows are still covered to protect them when the bricks are cleaned. The front porch will have full width brick steps later in the project.
 will be carefully reseated in wall before wood paneling is installed.")
November 2 - The wood floor is down in the Main House Guest Room. The blue sound insulation (upper right in photo) will be carefully reseated in wall before wood paneling is installed.

November 2 - If you look closely, you can see the cutout for the brick sides on the fireplace as well as the brick hearth. This photo was taken from the Kitchen looking into the Great Room.

November 2 - The Brays Room floor tile is nearly complete. The pipes at the far end of the room are for the island sink and power.

November 2 - Tile is being started on the Kitchen Screen Porch. The tile will have a brick border around it where it joins the house.

November 2 - The plank floor tile looks very nice. The techs have done an excellent job laying the tile so it is flat and flush.

November 2 - The Brays Room tile looks good.

November 3 - The mud base on the Guest House Screened Porch is partially done. The supplier ran out of dry mix, so it was not finished today. More is due very soon.

November 3 - The Brays Room floor is nearly complete.

November 3 - The guest showers are prepped for tile.

November 3 - The Jr. Master Screened Porch floor tile is being laid.

November 3 - The Kitchen Screened Porch floor tile is nearly complete.
 and is flat (notice the string on the right side under the brick).")
November 3 - The tile workers are careful to make sure the porch floor has a uniform slope (see the level) and is flat (notice the string on the right side under the brick).

November 4 - The Guest House Screened Porch tile is about 1/3 laid.

November 4 - The Jr. Master Screened Porch tile is almost complete. Both of these porches should be finished on Monday and the tile setters will move inside to bath floor tiles and showers.

November 4 - The Main House Kitchen Screened Porch floor tile is finished. The brick border still needs to be laid.

November 4 - The Brays Room floor tile is complete.

November 4 - Although the wood walls and base board will cover up an inch or so of the floor next to the wall, the tile setters cut the floor tile close to the wall. The white foam is spray in foam insulation.

November 4 - Notice how closely the tile setter trimmed the tile around the floor outlet. Again, this is an excellent tile job. The tile looks like wood and even has a slight texture to it. The pattern repeats every 1,000 feet or so making it difficult to find two tile alike.
 is for the brick wrap around the see through fireplace and the two hearths.")
November 4 - The cutout (inside the 'picture frame') is for the brick wrap around the see through fireplace and the two hearths.

November 4 - The garage extension has brick veneer. The center bay is a couple of feet deeper than the outside two bays for boat storage.
.")
November 4 - The Guest House has the interior trim carpenter's tool trailer in position and ready for work to begin on Monday. The first load of trim material will arrive tomorrow (Saturday).

November 7 - The protective plastic has been removed from the windows. The final wall brickwork has been completed.

November 7 - The house looks very different with the windows visible. The front steps and steps at the breezeway still need to be built.

November 7 - Another load of tile has arrived.

November 7 - The tile is being stored in the garage until it is needed by the tile setters.

November 7 - The Guest House Screened Porch tile is nearly complete.

November 7 - Interior trim materials were delivered on Saturday. Trim work will begin very soon.

November 8 - More interior trim materials arrived and are stored in the main house.

November 8 - The trim wood is beautiful. Several walls will be wood as will the wainscot in the hallway.

November 8 - The foyer has three sections of brick surrounded by reclaimed wood. The wood corners are carefully mitered. Wall material and baseboard will hide the crack between the floor and wall.

November 8 - Tile is being laid in the Laundry Room.

November 8 - Wood walls in the Guest House Great Room are being installed.

November 9 - The brickwork is finished on the Owner's entrance and the plastic has been removed so it is visible.
 is to connect the dryer vent. It will have a cover on it in the closet.")
November 9 - The Laundry Room / Owner's Entry floor tile is down. A washer and dryer go against the far wall. The opening (to the Walk In Closet) is to connect the dryer vent. It will have a cover on it in the closet.

November 9 - The Powder Room off the Laundry Room is tiled.

November 9 - The brick border is being laid on the Jr. Master Screened Porch. The tile is already in place.
 will also have wood walls.")
November 9 - The wood walls of the Guest House Great Room are completed. The room will have ceiling beams. The bedroom (through the door) will also have wood walls.

November 9 - The gable wall of the Guest House Great Room has been covered with wood. The right wall remains to be covered.

November 10 - Shower #1 in the Guest House has the Kerdi board and a curb in place. The white pipe is the location of the toilet.

November 10 - Tile is here for the Guest Shower.

November 10 - The Kitchen of the Guest House has a flat ceiling. This is where the HVAC unit is located. The boxes in the corner are floor tile for the two baths. The square opening above the kitchen ceiling is the HVAC air return.

November 10 - The doorway goes into Bedroom #2 of the Guest House. The walls in the bedroom will be wood installed vertically.

November 10 - The fireplace will have a brick surround and hearth. The glass door goes to the Screened Porch of the Guest House.

November 10 - Guest House Bath #2 has been prepped for tiles also.

November 10 - This is Bath #1 in the Guest House. Floor tile is complete, but not grouted yet.

November 10 - The under floor heating unit has been installed in the Jr. Master Bath. If you look closely, you can see the serpentine wire.

November 10 - Here the floor heating element is more visible. The tile floors in the Master and Jr. Master Baths are heated.

November 10 - The Jr. Master Water Closet floor is also heated.

November 10 - The Jr. Master Bath floor heating element is installed. Tile will go over it. The white pipe in the upper right is the drain for the tub.

November 10 - The long hallway of the Main House has solid wood wainscot. This hallway goes from the Foyer to the Jr. Master Bedroom suite.

November 10 - This end of the hallway goes to the Master suite end of the Main House.

November 10 - The brick border is being added around the Jr. Master Screened Porch. This porch already has tile on it. The plastic is to protect the tile.

November 10 - The dog shower in the Laundry Room is prepped for tile.

November 10 - The Laundry room tile has been laid, but not grouted yet.

November 10 - This is the Laundry room looking towards the Powder Bath. The door in the upper right corner goes to the Breezeway.

November 10 - The Master Bath floor heating element is in place. The Master Shower is behind the half wall on the left.
 shower is being prepped for tile.")
November 10 - Bath #3 (Julie's Office) shower is being prepped for tile.

November 11 - The Jr. Master Bath is ready for floor tile.

November 11 - The Master Bath floor is ready for tile. The opening on the right is to the Walk in Closet. The door in the center is the Master Shower. The hallway on the left goes out to the bedroom entrance.

November 11 - Wainscot is up in the 70 foot hallway. It does not have its trim yet.
 and wainscot look nice.")
November 11 - The wood floor (not finished yet) and wainscot look nice.

November 11 - The view from the Brays Room is beautiful.

November 14 - Two large box trucks brought out the cabinets today. This is the right bay of the garage. It is full of boxes of cabinets and parts.

November 14 - The center bay is also full of cabinets.

November 14 - This is looking from the front of the left bay across the center and right bays. Cabinets are everywhere.

November 14 - Guest House cabinets were unloaded in the guest house. There are some cabinets in the pantry that are not visible in the photo.

November 14 - The Jr. Master Bath floor tile is down. This tile has a heater under it.
 feet of walls. It is sheet rock above that. Trim boards will be installed at the transition.")
November 14 - The Foyer of the Main House is getting wood on the lower ten (approximately) feet of walls. It is sheet rock above that. Trim boards will be installed at the transition.

November 14 - The back wall of the bar also has wainscot on it. Again, trim boards will cover the transition from dry wall to wood.

November 14 - The wainscot wraps around the corner of the stair well and died out into the stairs.
, septic tank (large black), pump tank (smaller black tank in back) and drain field material arrived.")
November 15 - The LP tank (red), septic tank (large black), pump tank (smaller black tank in back) and drain field material arrived.

November 15 - The septic and pump tank positions were carefully painted on the ground with blue paint. They have to be 5 feet away from any structure.
. The tank will be filled with water so there is no chance it will float up out of the ground.")
November 15 - The plumbers then dug the hole for the 1,000 gallon septic tank. They dug deep enough they hit water (barely). The tank will be filled with water so there is no chance it will float up out of the ground.

November 15 - The septic tank was buried by noon. The two clean out covers are visible. They will not be covered until the DHEC inspection.

November 15 - The last load of tile arrived.

November 15 - The pump tank for the septic system is being placed in its hole. It turned out, the hole was too small and had to be enlarged a bit.
.")
November 15 - Inside, the Foyer walls now have wood on the lower portion (below the top of the transoms).

November 15 - The Brays Room is getting its walls. The location where there is no wall is where the grill and cabinets will be installed.

November 15 - The fireplace wall is about complete with wood. The chimney will be covered with brick so the wood did not need to extend to the Isokern chimney.

November 15 - The walls of Shower #1 in the Guest House is being tiled.

November 15 - The hole was enlarged and the pump tank is being lowered into position. A pump tank is needed here because the drain field is higher than the septic tank. This is not uncommon here in the South Carolina coastal Lowcountry.

November 16 - The septic and gas lines have been buried in front of the house. The septic is between the Guest House and the Main House and the drain field is on the far side of the Main house. The pump moves the effluent from the septic to the drain field. The LP gas tank is also located between the Guest House and the Main house.

November 16 - The Bath #2 shower in the Main House is being tiled.

November 16 - The Brays Room has wood paneling over the wall which separates the Brays Room from the Great Room.
 tank has been buried. It is in a good location for refilling and away from landscaping.")
November 16 - The LP (propane) tank has been buried. It is in a good location for refilling and away from landscaping.

November 16 - Two walls and the floor of Shower #1 in the Guest House have tile.

November 16 - The outside gable of the Brays Room is being covered with 1 x 10 tongue and groove pine.

November 17 - The inside gable of the Brays Room is covered with wood. The wood over the transoms is where the beam will go around the room. This beam will be a pocket for the automatic shades on the outside wall.

November 17 - The outside gable wall of the Brays Room is finished. The fabrication of the shade pocket beam is started.

November 17 - The master bath floor tile is being installed.

November 17 - Tile in Shower #2 of the Guest House is being finished.

November 17 - Tile in Shower #1 of the Guest House is also being completed.

November 17 - The Great Room of the Main House walls are being covered with 1 x 10 pine tongue and groove wood.

November 18 - The solid cedar beams arrived and are stored inside the kitchen. These beams will be installed in several of the rooms.

November 18 - Bath #1 floor in the Guest House is tiled and ready for grout.

November 18 - Two walls of Shower #1 are complete. The crown molding will run around the top of the room including the shower. The two white rectangles on the left side are where the quarter round shelves will be installed.

November 18 - Shower #2 tile is nearly complete. The shelf mounting slots are on the right side of this shower.

November 18 - The floor of Bath #2 is finished except for grout.

November 18 - The septic drain field is about 3/4 complete. Plans are to finish on Monday and call for inspection on Tuesday.

November 18 - Trim carpenters started on the Brays Room ceiling today. When one became ill and went home, the remaining two carpenters then started working on the Great Room Walls. To install the ceiling boards, two carpenters are needed on the scaffolding and one on the floor cutting boards.

November 18 - This is one location of the Brays Room wall that was started.

November 18 - Shower #3 is pretty well tiled. The niche has boards temporarily supporting the tile. A level is leaning up in the back left corner.

November 18 - The floor of the Master Bath is tiled and ready for grout.

November 18 - Tile is going up in the Dog Shower.

November 21 - Work on the drain field continues. There are four different trenches with a total length of approximately 200 feet.

November 21 - The area taken up by the drain field is relatively large. The sandy ground here should work well.
 is the effluent line from the septic pump. This line terminates at a distribution box that connects to the four drain field lines.")
November 21 - This white pipe (going from the bottom of the photo to the top) is the effluent line from the septic pump. This line terminates at a distribution box that connects to the four drain field lines.

November 21 - Tile is now down on Julie's shower floor and part of the bath floor. Notice the toilet flange on the right side of the photo.

November 21 - The sloped ceiling of the Brays Room has wood up to the flat portion in the center of the room.

November 21 - The ceiling on the fireplace side is getting its ceiling installed. Working off the scaffolds makes the work go a bit slower than normal.

November 21 - More tile is installed in the dog shower.

November 22 - Tile is being laid on the Master Shower.

November 22 - The Dog Shower tile is complete on the shower walls. The half wall in front will also get tile.

November 22 - This is the third wall of the Dog Shower.

November 22 - The floor in Julie's Bath is complete. None of the tile has been grouted yet.

November 22 - The tile in the Jr. Master Shower is being laid on the far wall.
 will be brick. The upper portion will be completed soon.")
November 22 - Part of the chimney in the Great room has wood on it. The lower portion (below the wood) will be brick. The upper portion will be completed soon.

November 22 - One of the Great Room gable walls has wood installed on it.

November 22 - This is another view of the Great Room chimney. The Dining Room is to the left of the fireplace; the Living room, the right.

November 22 - Outside, an electrical box has been connected to the pump tank for the septic system. The electrician will run wiring from the house to this box. The inspection was delayed until tomorrow because of the inspector's schedule.

November 23 - The auto bay doors on the Garage have tarps over them to prevent any rain from blowing in. They will also allow us to moderate the humidity inside the garage where many of the cabinets are stored.

November 23 - More tile has been laid on the walls of the Jr. Master Shower. Accent tile goes in the gap where the Kerdi board is visible.

November 23 - The Master Shower tile walls are also being set. If you look closely, you can see the lower niche on the wall on the left.

November 23 - Both gable walls of the Great Room are covered with pine. Templates have been cut for the beams. The chimney has wood on the top part. The area has been cleaned up and swept.
 gable on the Kitchen end now has wood on it.")
November 23 - The Great Room (Dining Area) gable on the Kitchen end now has wood on it.

November 23 - Wall boards are being installed in Bedroom #2 of the Guest House. Both Guest House bedrooms have 1x6 tongue and groove pine walls.

November 23 - We passed the septic inspection today. The drain field is covered.

November 23 - It has been dry, so we have begun irrigation again. While the septic drain field was being dug, the irrigation lines were cut. They are now capped so we can irrigate once more.
. By building them this way, the shower pan has no penetrations in it to leak.")
November 28 - Bench material arrived today. The benches are made of solid styrofoam covered with concrete board and then tile (or granite on the top). By building them this way, the shower pan has no penetrations in it to leak.

November 28 - Grouting work has begun. This is the floor of the bath in Julie's office bath. The colors are not overly faithfully represented by the camera, computer and software.

November 28 - The Brays Room floor and the three screened porch floors are grouted. The only plank flooring not grouted is in the Guest House. The great room is full of cabinets, shutters and trim materials. As soon as it is emptied, the floor will be cleaned and grouted.

November 28 - The Laundry floor is grouted.

November 28 - The Dog Shower floor is grouted. It has to be cleaned.

November 28 - The Master Shower tile has been grouted. The trim is oil rubbed bronze, not black as it appears in this photo. The ceiling tile has not been installed yet. Nor has the bench.

November 28 - Glass tile forms an accent band in the Jr. Master Shower.

November 28 - The Jr. Master Shower ceiling tile is going up.

November 28 - Bedroom #2 of the guest house is having wood walls installed.

November 28 - Bedroom #1 also has 1x6 tongue and groove wood walls. It is about half complete.

November 30 - The interior doors are being installed in the Guest House.

November 30 - The wood walls are now complete in the Guest House.

November 30 - This is the truss template for the Great room trusses.

November 30 - Each beam has a number of cuts in it so they overlap properly.

November 30 - This is finished truss number one. We'll use a lift and a chain hoist to get them into position.

November 30 - The Jr. Master Shower is nearly complete. The walls including the accent band have also been grouted.

November 30 - This is the higher niche in the Master Shower. The ladder is leaning in the doorway to the Master Walk In Closet.

November 30 - The Master Bath floor has been grouted. This floor has electric heat under the tile. The baseboard has not been installed yet. The tile also has not been cleaned so there are smudges on it.

November 30 - The Master Shower floor is also grouted. It needs to be cleaned. The bench is on the far left.